Since I started my consulting career on Dynamics CRM, I have always worked with onlines instances. Not long ago, I had to intervene on a project based on a 2013 OnPremise instance and so I was able to familiarize myself with the advantages and disadvantages that this type of instance can offers us. I’m not going to debate the subject of Online versus OnPremise here, although I intend to expose this reflection in a future article, but rather showing step by step how to install a Dynamics CRM v9 instance!
This post will also serve me as a reminder 🙂 !
Why I decided to install an OnPremise instance ?
As I said, the goal was to increase my skills on different technologies such as SQL Server, Active Directory, etc.
And I think it’s really important to manipulate an OnPremise instance to have a deep understanding of how Dynamics works.
In the V9 release, Microsoft introduced the Multiple Option Set field allowing users to add multiple items to a list of options. One day, with one of my colleagues, we wondered how Microsoft had implemented it in SQL Server. Of course, since we can not connect directly to the database when we use an online instance, the only way was to install an OnPremise environement!
Prerequisites
Before starting the installation, I decided to review the prerequisites to make sure I’m on the right track to avoid compatibility issues. Applying to Dynamics CRM CE (9.X), it requires the following software:
- Windows Server
- Active Directory Domain Services Role
- IIS (Web Service) Role
- SQL Server
- SQL Server Reporting Services
- Dynamics CRM 365 Server
Depending on your needs, you will need to install different additional components like:
- Exchange Server or a POP3-compliant email server (for email tracking)
- SharePoint Server (for document management)
- Microsoft Office ( for integration: App for Outlook, addin Outlook, Office Online…)
SQL Server Requirements
Microsoft has stated that if you try to use Dynamics 365 for Customer Engagement databases on a computer that has a recommended configuration that is less than that recommended below, performance may not be sufficient.
These recommendations are based on load tests of 320 users, without additional components. In our case, it is a test environment so we will never exceed more than 10 users!
[su_table responsive=”yes”]
| Component | Minimum | Recommended |
| Processor | x64 architecture or compatible dual-core 1.5 GHz processor | Quad-core x64 architecture 2 GHz CPU or higher such as AMD Opteron or Intel Xeon systems |
| Memory | 4 GB RAM | 16 GB RAM or more |
| Hard disk | SAS RAID 5 or RAID 10 hard disk array | SAS RAID 5 or RAID 10 hard disk array |
[/su_table]
The latest version of SQL Server (2017) is, of course, supported but only since the Update 3 and Express editions are not !
To summarize, you can use Microsoft SQL Server 2016/2017 Enterprise, Standard or Developer (only for the development environment of course)!
Dynamics 365 Server Requirements
As for install the SQL Server, Dynamics CRM has certain requirements to make sure that it will not cause a slowdown problem, for example, when you run rigorous business logic!
Here is an overview of Microsoft’s recommendations:
[su_table responsive=”yes”]
| Component | Minimum | Recommended |
| Processor | x64 architecture or compatible dual-core 1.5 GHz processor | Quad-core x64 architecture 2 GHz CPU or higher such as AMD Opteron or Intel Xeon systems |
| Memory | 4 GB RAM | 8 GB RAM or more |
| Hard disk | 10 GB of available hard disk space | 40 GB or more of available hard disk space |
[/su_table]
Windows Server Requirements
The first thing to know is that Dynamics CRM only works on 64-bit systems for obvious reasons! And as an SQL server, you can only use specific editions:
- Windows Server 2016 Standard
- Windows Server 2016 Datacenter
Other ones like 2016 Essantials, 2012 or 2018 family are not supported!
Keep in mind that the computer which will run Dynamics CRM must be a member of a domain Active Directory (2008,2012 are supported)!
To access your CRM instance, you need to install version 10 of Internet Information Services (IIS)! I recommend that you install it before trying to install Dynamics CRM. It will work too, but the installation of Dynamics CRM will be even heavier!
Scenario
Remember that there are many factors to consider in order to obtain a well optimized configuration! In this case, I will install all components on the same server, but since this is only an instance for training and development purposes, we don’t really care!
So, we wil work with the following components :
- Windows Server 2016 DataCenter 64-bit hosted on my computer
- 50,00 Gio Hard Disk
- 6 Gb Ram
- Active Directory Domain Services role
- Web Server (IIS) role
- Windows Sever SQL 2016 Enterprise SP2
- Dynamics 365 Server version 9.02.3034
Installation
I will not show how to traditionally install a Windows server because, if you are here, it means you know how to do it.
1 – Click on “Add roles and features”.

2 – Ensure that “Role-based or feature-based installation” is checked.

3 – Select your server from the server pool.

4 – Add the “Active Directory Domain Services” roles.

5 – Normally you have nothing to add so just click on “Next”.

6 – When the Active Directory Domain Service windows appears, continue clicking “Next”.

7 – Let’s confirm the role installation.

8 – Once the installation is complete, promote this server on a domain controller by clicking on the link.

9 – Make sure that the “Add new forest” option is checked and indicate the root domain name you want (yes, I used one of the fictional Microsoft companies).

10 – Check the box “Domain Name System (DNS) Server and choose a password for the Directory Services Restore Mode, then click on “Next” to reach the DNS Option.

11 – Set the NetBIOS domain name assigned to this domain and click on “Next”.

12 – You can keep the default locations for AD FS database, log files and SYSVOL.

13 – If you are sure about the configuration, you can click “Next”.

14 – Make sure the Prerequisites Check is passed and click on “Next”.

15 – Just wait until installation is completed (Coffee break!).

16 – The server will ask you to restart at the end of the process and, once restarted, you will be able to login with your domain credentials!


17 – Now let’s start the SQL Server installation! Once the window appears click on “New SQL Server”.

18 – Wait until process is finished and click on “Next”.

19 – Enter your key product.

20 – Accept the terms and “Next”.

21 – Ensure to select the following features ans click on “Next”:
- Database Engine Services
- Full-Text and Semantic Extraction for Search
- Reporting Services – Native
- Client Tools Connectivity
- Integration Services
- Client Tools Backwards Compatibility
- Client Tools SDK

22 – Set the instance ID for the SQL Server.

23 – You can keep the default values here.

24 – Choose the authentication mode and set the SQL Server Administrator.

25 – Select the SQL Server directories (you can keep default values).

26 – Here I decided to choose only to install and not to configure the Reporting Server (we will do it later).

27 – Then start the installation !

28 – Another Coffee break 🙂

29 – Make sure the installation is completed successfully before closing it.

30 – Start the Dynamics 365 installation !

31 – Click on “Next”.

32 – Wait until copying process is finished.

33 – Enter the Dynamics Key and then “Next”.

34 – Accept the terms !

35 – Click on “Next” if all components were installed successfully.

36 – Keep the default location and click on “Next”.

37 – Select Dynamics Server Roles (this is where you can choose if you want only a front-end server, a primary server, or a full server).

38 – Indicate that you want to create a new deployment and select the SQL Server.

39 – Define the Organization Unit (I created a dedicated organization in Active Directory just before this step.).

40 – Enter all Dynamics service accounts (I previously created a dedicated user for each).


41 – Since I did not install the IIS Server feature, we will create it to complete the installation.

42 – You can skip this step directly (unless you want to configure mail integration).

43 – We define the specificities of the organization such as the currency, the name etc …

44 – Indicate the Report Server URL and then click on “Next”.

45 – If the system check is ok then click on “Next”.

If you have some erros about user permission, don’t forget to add them the “Performance Log Users” role.

46 – Dynamics 365 installation process is started.

47 – Once done, you can directly install the report extensions by checking the corresponding option.

48 – Select the computer running the SQL Server.

49 – Select the SSRS Instance .
Of course, you must first correctly configure the Reporting Services, you can refer to this link : Configure SQL Server Reporting Services for on-premises deployments).

50 – Keep the default installation location.

51 – Make sure there are no errors and click “Next”.

52 – Click on “Next”.

53 – The process start!

54 – When it’s done you can close it!

55 – Then you can use a web browser and access to http://localhost:555/Contoso to view your CRM instance!

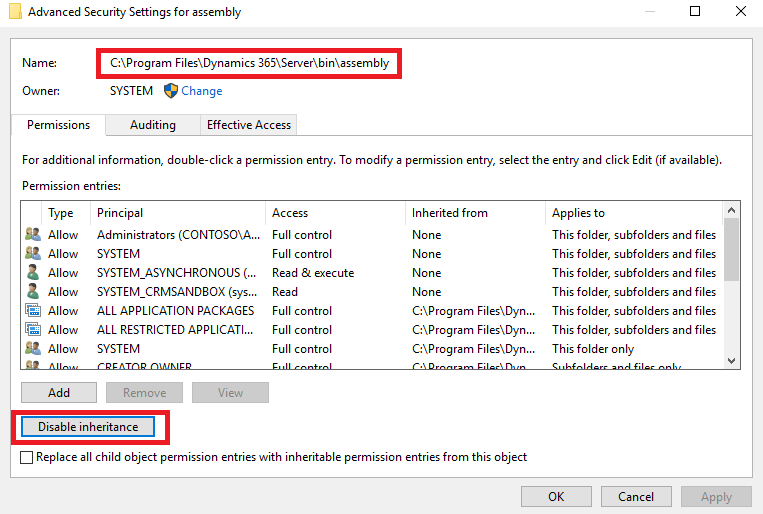
When creating a record, if you have an error about Assembly can’t be load ensure that the inheritance is enabled for the following folder: C:Program FilesMicrosoft Dynamics CRMServerbinassembly

If the error persists, you can also make sure that the owner of the database is an administrator:

Congrats, we have our OnPremise CRM instance for training / development!
Here is a useful link to a microsoft guide for the implementation of Dynamics 365 (OnPremise and OnLine) : Microsoft Dynamics 365 Implementation Guide for on-premises and online
Source : Official Microsoft Documentation, internet and my own brain.

Leave a Reply