
Having worked primarily with D365 modules, it is quite common to set up approval systems for specific business cases. In this article, we will focus on the Power Platform’s standard ability to set up an approval system.
Definition & Business Scenarios
Before getting into the technical solutions, I thought it was essential to look at the approval process itself.
Let’s start with two quite simple cases where an approval process can be implemented:
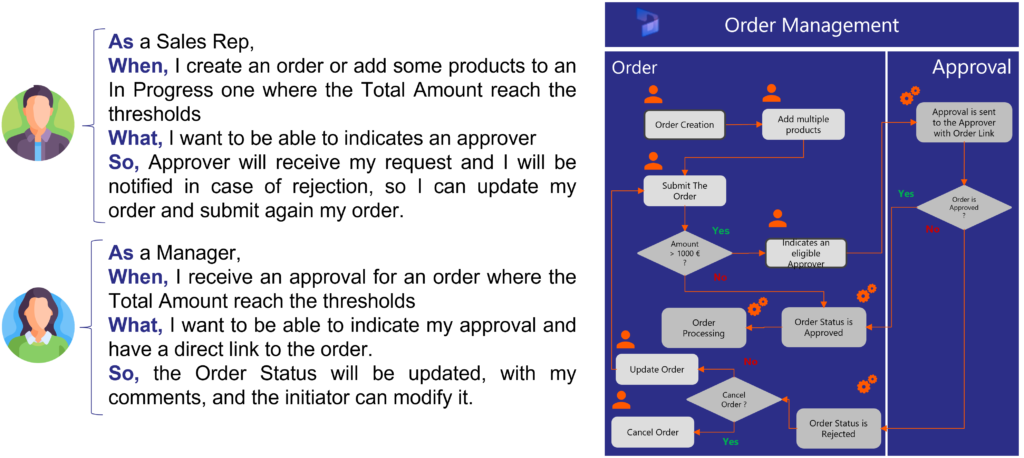
Business Case: Order Management
A basic and frequent scenario would be a case to handle order approvals based on a threshold amount. A salesperson placing an order of a certain amount would have to go through an approval process to be able to validate his order and continue his actions. In this case, he could also decide to cancel his order if it is rejected or update it via adjustments that would also be approved or not.
Business Case: Building Access
After going through the COVID epidemic, the return to the office was a challenge for companies who had to ensure the use of their facilities but also on the norms of social distancing via reservations allowing to control occupancy rates. Many applications were created, and the issue of approval could totally fit into this type of scenario. Microsoft had developed an application template to handle this type of scenario, and an approval process is used for the following case:
- If the office space is near capacity, an approval is sent to their manager before the visit is allowed. Managers approve visits using a custom approval screen in the canvas app or an adaptive card in Microsoft Teams.
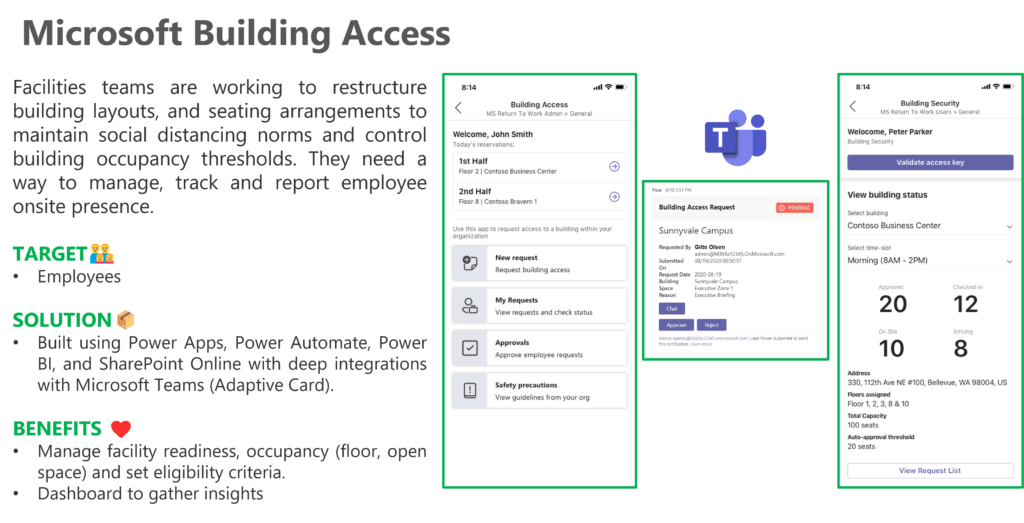
If you want to get your hands on it, follow this link: Learn how to deploy this solution within your own Microsoft Power Platform environment.
Definition
If we take a step back, we understand that there are three essential elements that make up what we call an approval process:
- Request: Data is collected from user input, external systems, or other sources and might be a document, multiple documents, a single value, or the results from another system. The user initiates a request for approval, or the system might automatically initiate an approval based on criteria or scenario.
- Review(s): Review steps can be simple or complex depending on whether other processes are involved (e.g., child approvals, business processes) but also on the number of reviewers. There can be one or more approvers who are in charge of assessing the information and taking a decision.
- Action(s): Based on the outcome of the review step, the process takes action to release a business process.
Power Platform Approval Solution
Now that we have in mind the business cases that must have given rise to a multitude of other ideas, existing or not, let’s take a deep dive into the approval system that the Power Platform offers as standard.
What’s included?
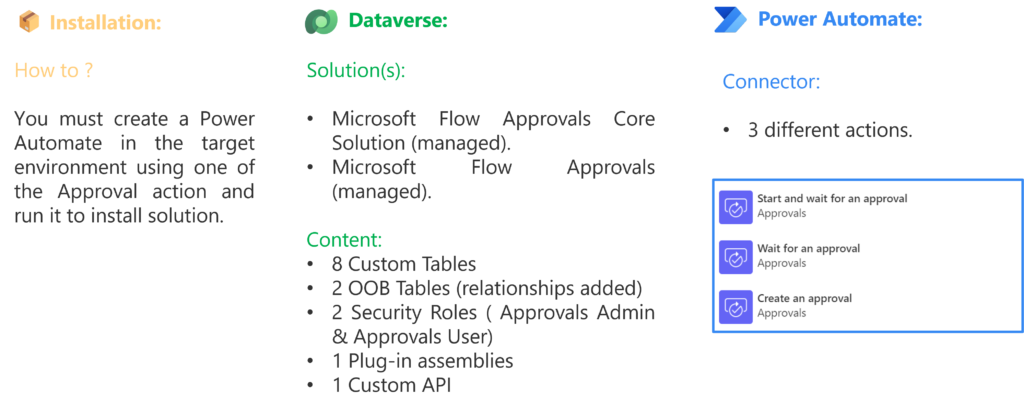
Firstly, if you want to install the approval solution you will not have to get it from App Source but simply create a Power Automate in the target environment using one of the approval actions and run it one time to install the solution ( 😮 ). I must admit that I’m not a big fan of this approach which is far from the DevOps/ALM culture, but here we have no choice!
When this operation will be finished, you could distinguish that two managed solutions are installed in your environments:
- Microsoft Flow Approvals (managed): This one is absolutely… empty! I’m not kidding, I don’t even know the purpose of this solution 😃.
- Microsoft Flow Approvals Core Solution (managed): In this one we can see some interesting components.
- 8 Custom Tables
- 2 OOB Tables (relationships added)
- 2 Security Roles (Approvals Admin & Approvals User)
- 1 Plug-in assemblies
- 1 Custom API
As far as Power Automate is concerned, we find of course this famous connector Approvals allowing us to use three distinct types of actions: Start and wait for an approval, Wait for an approval & Create an approval.
Approval Data Model
After spending some time exploring this Data Model and doing some tests to understand how it reacts according to the actions, I thought it would be a clever idea to model this one (if you detect an issue, don’t hesitate to tell me 🙂 ).
Here are some of my observations:
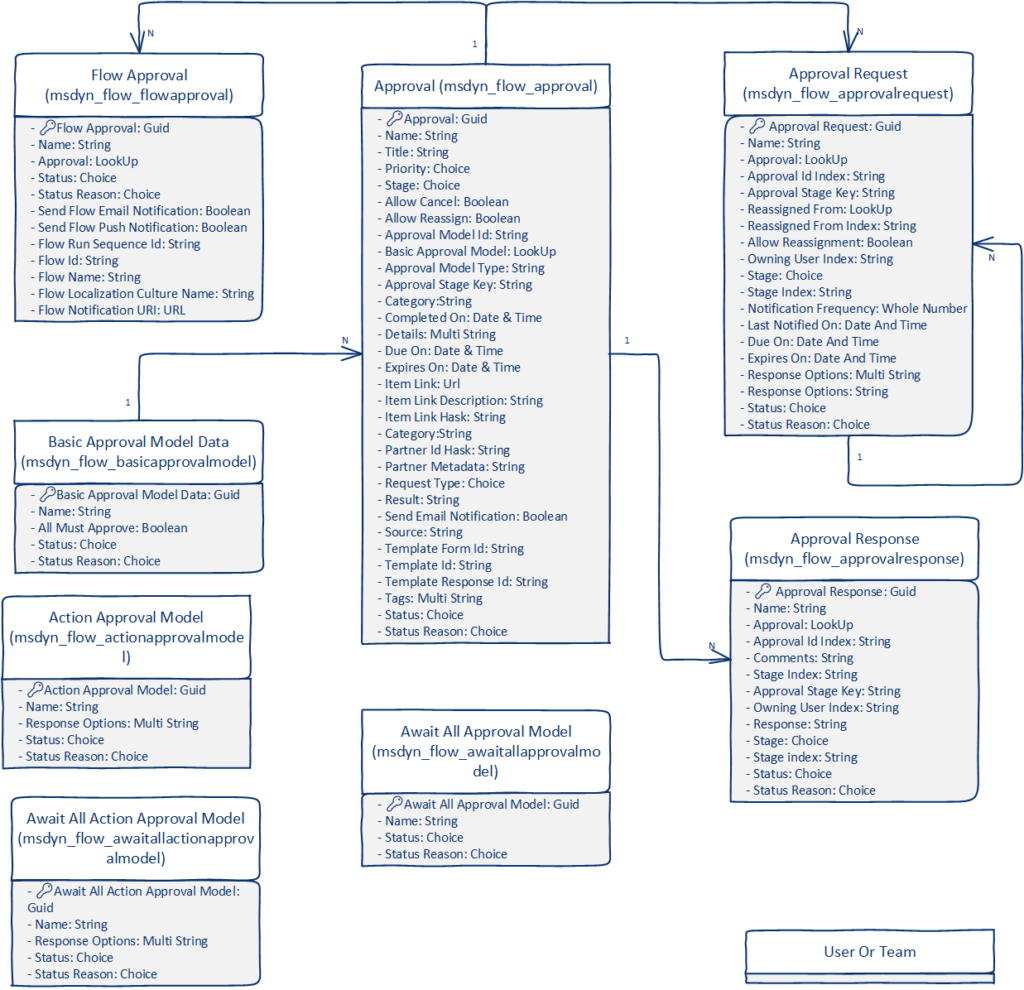
- All custom tables are defined with the User or Team ownership. As can be seen, the main object is the table Approval.
- Flow Approval is created for each Approval action when a Flow is run.
- Await All Approval Models are created for each Approval action when a Flow is run.
- Flow Approval and Approval record are deleted after response received.
- Approval Request are not deleted whenever we approve or reject.
- Records are created by a specific user: Microsoft Flow CDS Integration Service.
- Flow runs are saved in the Flow Approval table including Flow and Flow Run Id.
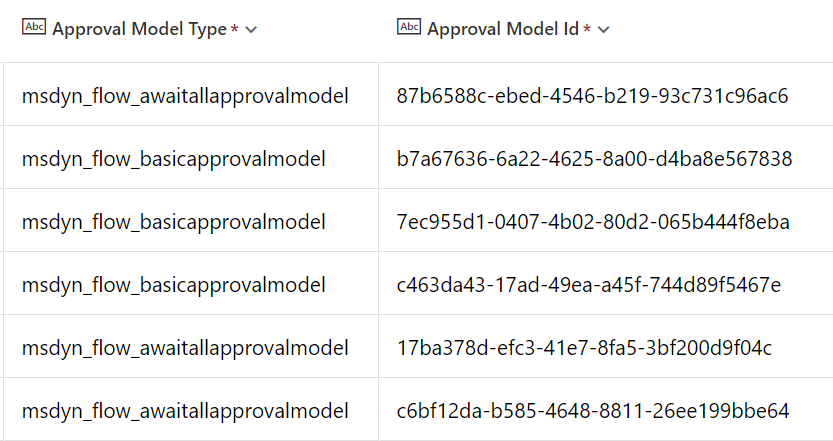
- Some string fields are used to store GUIDs (quite strange but acting as a lookup by internal process).
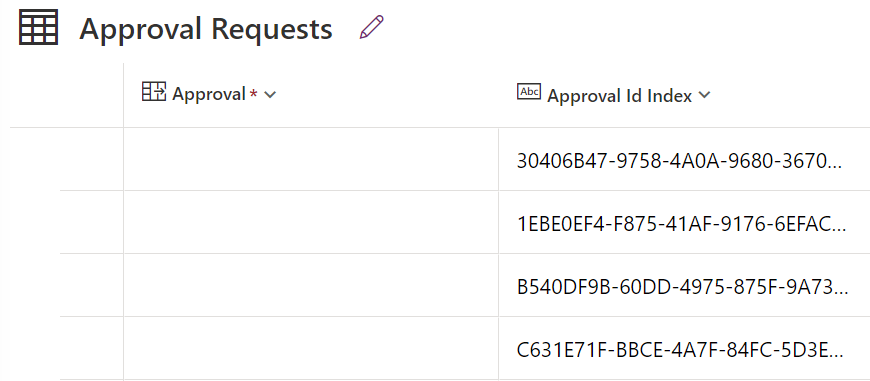
Another example is the relationship between Approval Request and Approval where the lookup is present but always empty but stored in a separate string field:
Approval Types & Life Cycle
Let’s focus on two specific and interesting points about the types of approvals and the implemented life cycle. While looking through this data model (which I recommend you explore), my attention was drawn to two choice fields: Approval Status (State & Status Reason) and Request Type.
Approval Types
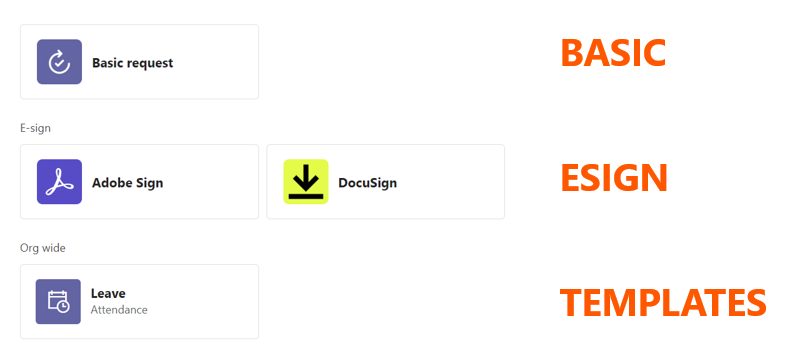
By default, the Request Type field (on the Approval table) is initialized with the value “Basic” and whenever I create an approval using the Power Automate Connector I can’t change it, but I discover that three other values are available:
- Other: I didn’t find anything about this one, but I assume that it’s an option to use when we do custom approval and do not want to trigger some process.
- Templates: After a lot of investigation, I could understand that it was linked to the use of an approval previously created from a Template via the Teams application. In this case, Template fields on Approval contains data.
- eSign: In the same way, it is a case of initiating an approval using an electronic signature provider (currently only Adobe Sign and DocuSign).
Approval Life Cycle
If we take a closer look, we will discover that the Approval has states with which we can clearly understand the various stages of the processes mentioned above. The interesting thing is that this means we can easily update this status to act on the approval process via external events (e.g., cancel an approval because a new threshold is available for this amount, or it has become VIP etc.).

Power Automate Connector
Now that we know a little more about this solution, let’s take a closer look at the connector that can be used with Power Automate with the three available actions. Note that I will only use a basic Approve/Reject type 🙂 (at least for this blog post).
Simple Approval Type Approve/Reject
By creating a simple approval, many options are available, allowing us to both build content with a nicer look and feel (via markdowns) but also to choose the type of approval. What’s interesting is that we can easily retrieve the associated adaptive card when the flow has been executed to potentially send a card across teams via a chat or channel. Note that some of the fields we saw earlier are not available, which is a pain, but as you know we can always update the associated record if we need to, for example, change the default value of the Priority from Medium to something else.
Here is an example of this type of approval:
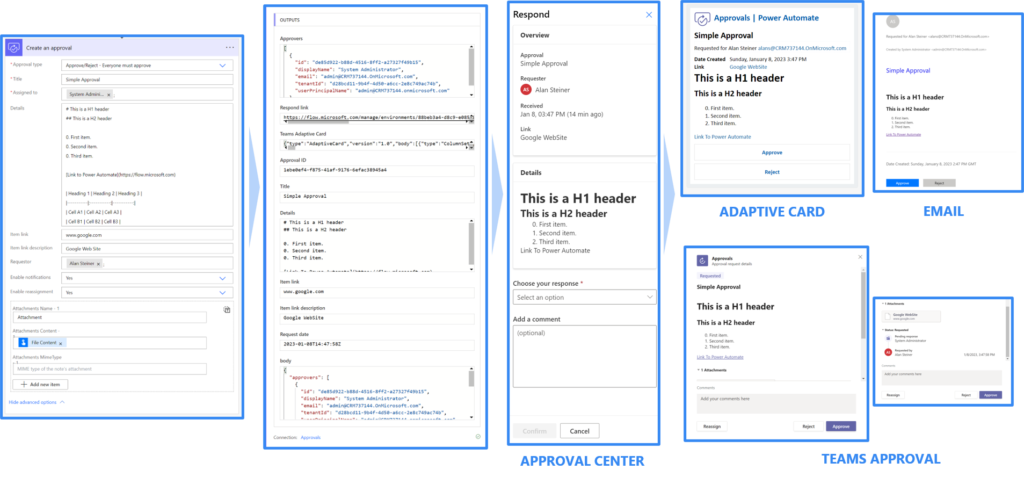
If we look in detail at what happens on the Dataverse side here is what the records contain (I focused on the most interesting of course 🙂 ):
- 🧾Flow Approval: One record is created.
- Status: Created
- Send Flow Email: Yes
- Send Flow Push: Yes
- Flow Id: Link to Flow Id.
- Flow Id sequence: Link to Flow run Id.
- Approval Name: Link to Approval.
- 🧾Await All Approval Model: One record is created too but to be honest I’m not sure why and how it’s used.
- Status: Active
- Owner: Alan Steiner
- 🧾Approval: As you can imagine, it’s the main record of the process and it stores all information fill-in within the flow action.
- Status: Pending
- Title: Simple Approval
- Details: #This is a H1 header
- Priority: Medium
- Allow Cancel: Yes
- Allow Reassign: Yes
- Send Email: Yes
- Request Type: Basic
- Stage: Basic
- Item Link: www.google.com
- Item Link Description: Google WebSite
- Owner: Alan Steiner
- Expire On: 9999
- Approval Model Id: Guid of the Await All Approval Model record.
- Approval Model Type: msdyn_flow_awaitallapprovalmodel
- 🧾Approval Request: This record is the most important one because, as its name indicates, it represents the approval request and has a life cycle.
- Status: Active
- Notification Frequency: -1
- Stage: Basic
- Last Notified On: 1/8/2022 3:48PM
- Expire On: 9999
- Allow Reassignment: Yes
- Owner: Sys Admin
- Approval Stage Key: Guid of the approval record.
- Owning User Index: Sys Admin
- Approval: Link to Approval
- Response Options: [“Approve”,”Reject”]
- Reassigned From Id: <none>
Wait for an Approval
As we have just seen the action of creating an approval, it is possible to set up a second Flow to wait for the end of it or at least for there to be one or more responses depending on the type chosen.
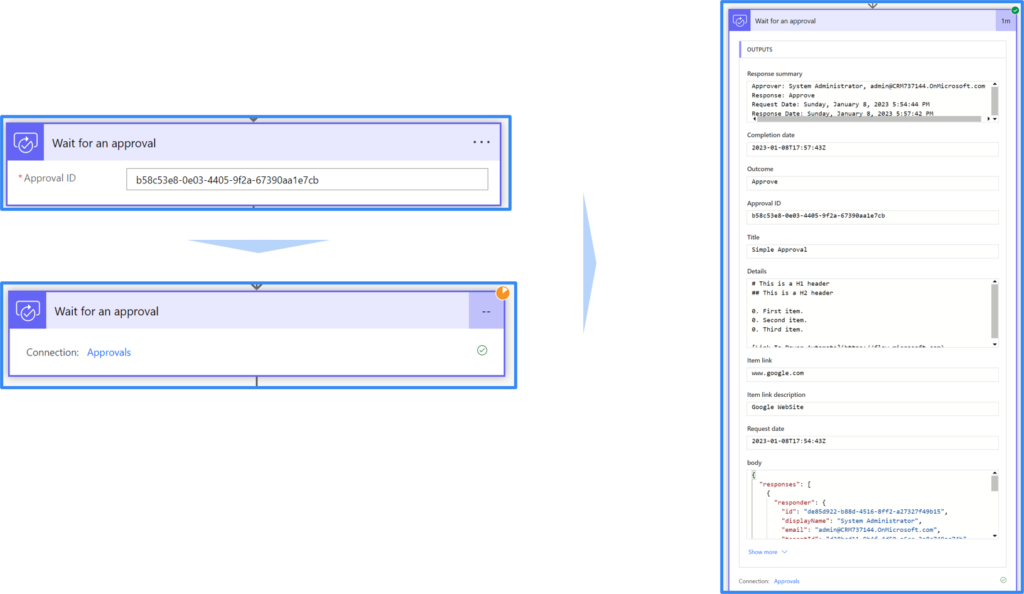
In this case, no record has been created because it is entirely managed within the flow.
Start and Wait for an Approval
The last action allows you to simply combine the last two actions we have seen to both initiate approval and wait for its completion.
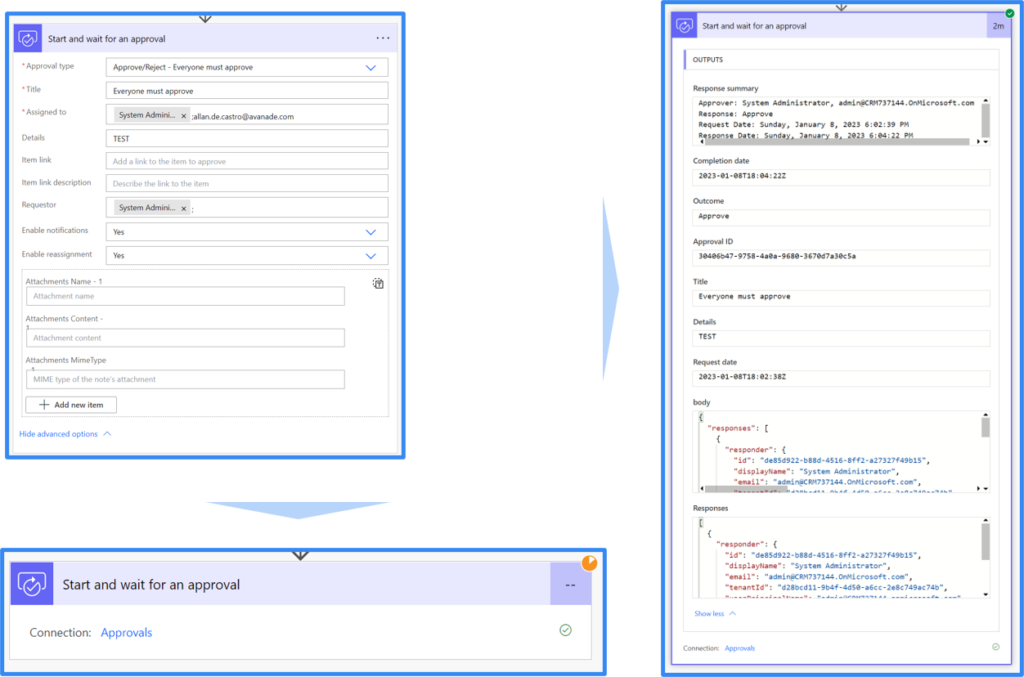
In this case, here’s what’s happening in Dataverse:
- Flow Approval record is created.
- Approval Request is created.
- Await All Approval Models are created.
Ok and what happens after the reviewer(s) approve/deny this approval?
- Flow Approval record is deleted.
- Approval record is deleted.
How to update the status of a running approval?
As we have seen above, the Approval table has a life cycle and we can imagine other scenarios where external events could change the state of the Approval record and therefore suspend, abandon, or even cancel it. For example, it could be based on an approval threshold that is re-evaluated, a maximum response time reached, to manage multiple approval levels etc.
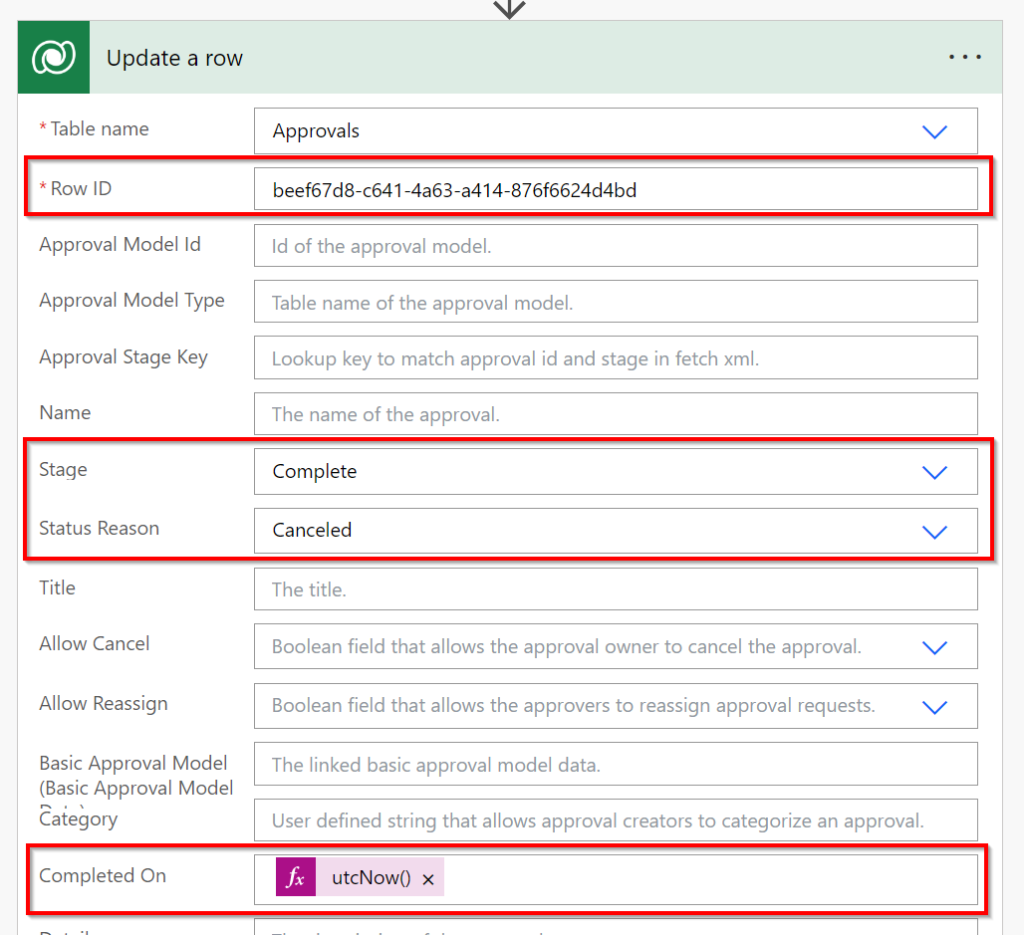
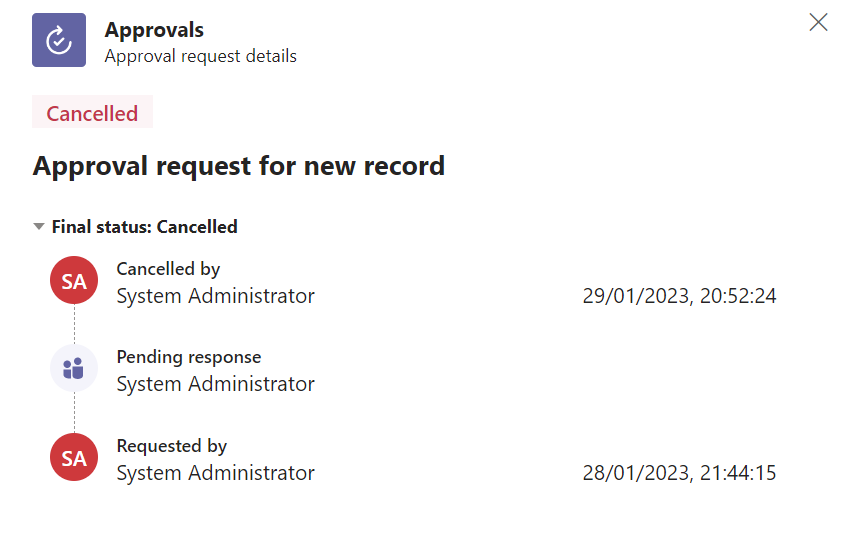
Note that I also set the Status field to “Inactive”. By navigating to Approvals within Teams, we can see that it is well updated as in Dataverse:

Considerations & Limitations
There are several points to keep in mind and I wanted to mention some of them:
One of the crucial points to keep in mind is of course the installation process within your environment which requires running a Flow with the Administrator role to create the Dataverse database (if it is not present).
The use of approvals is possible within the default environment and in this case Dataverse is already installed, however this raises some governance issues given the number of records that can be created.
One of the big positive points is that the connector is Standard and can be used with the most common licenses (O365, Power Automate…).
It is possible to use M365 & Security groups for reviewers, but in this case, they will not receive Team notifications.
In the case of using custom responses, only five are allowed for Outlook and Web Access. Also note that if the type is set to “Everyone must approve” this can cause problems as the “Result” field is limited in size.
If you want to send approvals to guest users, they must have a Power Automate license to view and respond.
In the case where you also send the notification by Teams via Adaptive Card, the latter will not be updated if a response has already been provided (I recommend that you separate the submission of this card with a second flow and manage the response yourself having taken care to consult the status of the approval in the database).
As you know, Power Automates have a lifetime run of 28 days and when this threshold is reached the status in Dataverse regarding Approval does not change, so I recommend you either to impose a limit upstream allowing you to cancel the current approval (via a run after branch) or to implement a Power Automate that would “restart” the Flows still in progress having exceeded 28 days.
Next steps:
I hope you enjoyed this article and that it enlightened you on the native function of Approvals! 🙂
To go further, many topics clearly need to be explored after this first step is done, like for example:
- Custom Reponses.
- Reassign feature.
- Sequential & Parallel Approvals.
- Microsoft Teams Approvals application.
- Use of APIs to retrieve approvals.


Comments (5)
Simonsays:
March 26, 2023 at 1:55 PMGreat writeup! I’m investigating ways to create a custom dashboard in a model driven app to display open approvals assigned to the authenticated user. I think some of your analysis will come in very handy as I start to build this out.
Allan De Castrosays:
April 12, 2023 at 10:34 PMIt’s a pleasure to hear that Simon 🙂
Mike McCluskiesays:
September 26, 2023 at 5:48 PMnice to see and ERD of the approvals app tables. will be very useful for creating audit reports. have you discovered where the “Source” column in the Teams Approvals app can be populated/updated?
Allan De Castrosays:
November 1, 2023 at 7:07 PMI’m glad to hear that! No I think it’s populated automatically somewhere maybe in background !
KACsays:
June 18, 2024 at 8:51 PMThanks, I appreciate your sharing the fruits of your time & efforts invested while creating this post. It’s been very helpful.